AXES 0–1
Left Stick
X Y Mag Angle
'%3e%3cpath fill='none' stroke='%23f5f5f4' stroke-linejoin='round' stroke-width='6' d='M31 67c-5-16 4-33 20-37 8-2 15 0 20 5 5-5 12-7 20-5 16 4 25 21 20 37l-5 18c-2 9-14 11-20 3l-9-12H60l-9 12c-6 8-18 6-20-3l-5-18Z'/%3e%3cpath stroke='%2354b1ff' stroke-linecap='round' stroke-width='6' d='M47 51v22M36 62h22'/%3e%3ccircle cx='86' cy='56' r='5' fill='%2342d399'/%3e%3ccircle cx='99' cy='69' r='5' fill='%23fba84d'/%3e%3c/g%3e%3cpath fill='none' stroke='%2354b1ff' stroke-linecap='round' stroke-width='3' d='M24 101h80' opacity='.7'/%3e%3ctext x='146' y='69' fill='%2354b1ff' font-family='DM Sans%2c Arial%2c sans-serif' font-size='36' font-weight='700' letter-spacing='-1.2'%3eGamepad Tester%3c/text%3e%3ctext x='149' y='96' fill='%237c8794' font-family='IBM Plex Mono%2c monospace' font-size='12' font-weight='600' letter-spacing='3'%3eONLINE CONTROLLER DIAGNOSTICS%3c/text%3e%3c/svg%3e)
01 / Controller diagnostics 🎮
Find idle noise, compare deadzone modes, and tune stick response in your browser.
LIVE RANGE / CENTER ZONE
AXES 0–1
AXES 2–3
05 / SAMPLE HISTORY
No samples yet
02 / The signal behind the feel
Use the live tool first, then read the signal in plain terms.
A deadzone is a small area around the middle of an analog stick. Input inside that area is treated as zero. The goal is simple: stop tiny sensor noise from moving a camera, menu, or game character when your thumb is off the cap. Every analog part has some spread. A pot can show a small offset after wear. A hall sensor can still report a slight value because of its magnet, board, or software path.
The center may also shift with heat, a loose spring, dust, or a stored calibration value. That shift does not always mean the controller has failed. A small zone can hide a light offset while keeping most of the stick range. A large zone can hide a stronger fault, yet it also removes fine aim and slow walk control. That trade-off is why a useful test shows raw movement and filtered movement side by side.
Think of the zone as a quiet room around center. A point that stays inside the room is calm. A point that rests outside it is sending a signal that a game may use. The right value is the lowest setting that keeps an idle stick still. Test both sticks, since one may be clean while the other shows noise. 🎯
Radial mode treats the stick as a vector. It draws a circle around the center and measures the full distance from that center. Any point inside the circle is quiet. Any point outside the circle is scaled back into the usable range. This keeps the same center rule for left, right, up, down, and every diagonal. It suits games where diagonal aim should feel even.
Per-axis mode checks X and Y as two separate lines. A value on X can be blocked while Y stays active. That can help when one sensor path is noisy and the other is clean. For example, a stick may wander left and right while its up and down signal rests near zero. A per-axis zone can mask the noisy line without taking as much response from the clean line.
| Mode | Best fit | Trade-off |
|---|---|---|
| Radial | Even aim and natural diagonals | Uses one shared center radius |
| Per-axis | Uneven noise on one line | May feel less even on diagonals |
Start with radial for a general check. Switch to per-axis when the readouts show a clear difference between X and Y. Do not choose a mode by name alone. Move the cap slowly, let it rest, and compare the result with how your game feels.
Use a wired link for the first pass. A cable removes one source of wireless noise, though a good Bluetooth link can work too. Open the page, press a controller button if the browser has not exposed the pad, and wait for the name to appear. Keep both caps untouched while the first idle samples collect.
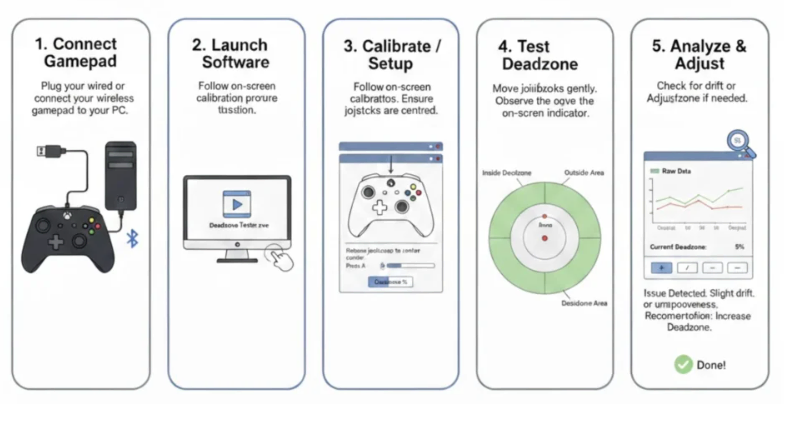
If the point creeps while your hand is away, note the largest idle value. Run the same pass again after a reconnect. If the symptom looks like steady drift, compare it with the Stick Drift Test. The second check can help separate a center offset from wider jitter.
The browser Gamepad API exposes a controller snapshot with button values and axis values. Most standard pads report each stick as two numbers from -1 to +1. The first pair is usually the left stick. The second pair is usually the right stick. The tool reads those pairs, keeps the raw values in memory, and draws a local point for the current position.
The filter then applies the selected mode. Radial mode measures vector length before it remaps the range. Per-axis mode remaps each line on its own. Sensitivity changes the displayed processed value, while the CSV keeps both raw and filtered fields. You can read more about the browser contract in the MDN Gamepad API reference.
The main circle shows the left-stick signal and the two side cards keep both sticks visible. Numeric output matters because a chart can hide small changes on a narrow screen. The log adds a time, controller name, mode, settings, raw axes, filtered axes, magnitude, and angle for each sample. Nothing is sent to a server. Export is a manual CSV action.
Auto-Suggest is a helper, not a repair claim. It looks at a short window of idle samples. For Radial mode, it finds the largest center distance and adds a small margin. That margin gives normal sensor noise a little room. For Per-axis mode, it finds the largest absolute X and Y offsets separately, then adds the same kind of margin to each line.
The result is capped at 0.5. That limit keeps a recommendation from turning into a nearly unusable center zone. The tool also refuses to guess when it has too few samples. Keep the controller still while the sample count grows. If you move the stick during the idle window, clear the logs, release the cap, and collect another run.
A good suggestion should feel boring. The point should stay quiet when released, while a small deliberate move should still leave the zone. Try the suggested value in the game you care about. If aim feels slow, reduce the value in small steps. If the camera still creeps, raise it slightly and test again.
Use Radial when the two axes show similar idle spread and the stick path feels round. It gives one clear rule for the whole center. This is often easier to match across games because the same radius applies to every direction. It also avoids a strange pause when a diagonal crosses two separate axis thresholds.
Use Per-axis when one line clearly carries more noise. A worn X sensor may wander while Y stays near zero. A shared radial zone large enough to hide X would then remove more clean Y response than needed. Separate values can preserve that clean movement. Watch for the opposite problem: if both axes are noisy, separate filtering may make diagonals feel uneven.
Make the choice with data and feel. Read the idle values, move in four directions, then test both diagonals. A mode that looks tidy but feels late is not the best mode for that game.
There is no single value for every pad. A new controller with a stable center may work at a very low setting. A worn controller may need more room. Competitive aim often favors a smaller value, while a casual game may feel fine with a wider one. Start low, raise it slowly, and stop once the idle point stays inside the quiet area.
| Range | What it means | Good next move |
|---|---|---|
| 0.00–0.04 | Very responsive center | Use when idle noise is tiny. |
| 0.05–0.12 | Common everyday range | Good first range for light noise. |
| 0.13–0.25 | Noticeable center loss | Check wear and compare games. |
| Above 0.25 | Large mask for a strong fault | Plan a repair or replacement. |
After setting a value, push the stick slowly through its full range. The outer edge should still reach close to the edge of the plot. If the point feels stuck near center, lower the value. If drift returns after a short rest, the hardware may be changing rather than showing one fixed offset.
Start with the link. Disconnect and reconnect the pad, refresh the page, and press a button to wake it. If Bluetooth looks noisy, run the same check over USB. Test one other browser as well, since Gamepad API mapping can differ. Keep the controller still during an idle pass and avoid touching the cap while Auto-Suggest collects data.
Cleaning can help when dust reaches the stick base, but use dry air and follow the controller maker's safety advice. Contact cleaner and solvents can harm plastic or remove grease. A module swap may need solder work. If you are not trained for that job, ask a repair shop. For a broad check of buttons, axes, and raw input, use the Joystick Tester before opening the shell.
A deadzone can hide a symptom. It cannot restore a worn sensor.
No. It filters a range of input so a game ignores it. It can make mild drift less visible, but a large or growing signal may need cleaning, calibration, repair, or a new controller.
Use Radial when both axes have similar noise and you want even diagonal response. Use Per-axis when one line is noisy and the other is clean. Test both with the same idle and movement pass.
The tool needs at least ten idle samples. Keep your hands away from the sticks while they collect. More samples give a steadier view of small noise.
Some browsers need a button press before they expose a pad. Wake the controller, check the browser tab, and click Detect Controller again. A private or restricted browser context may also limit access.
Yes. Enable keyboard simulation, then use arrow keys or WASD for the left stick. This path helps you learn the controls and check the page, but it cannot measure hardware noise.
No. Readings and logs stay in the current tab. The only file action is the CSV export you start yourself. Do not share an exported file if it contains details you want to keep private.